Alert: Before you can load your Address or Coordinate data set (csv file), you must create a layer in GovClarity™. Click here for instructions.
Note: You do not have to create a layer before loading Shapefile data sets.
Loading an Address or Coordinate Data Set
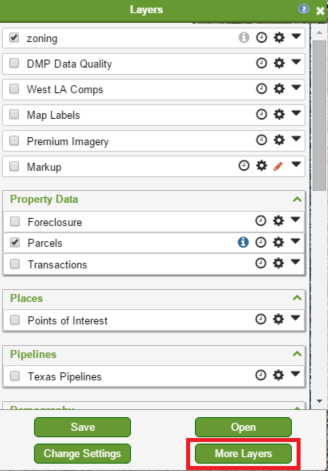
Data Loader is part of the Browse Layers window. To open the window, click the More Layers button at the bottom of Layers, as shown to the right.
After you've created a layer, perform the following in the Browse Layers window:
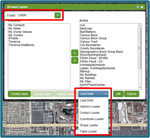
Select a folder from the Folder drop-down menu in which to save your data set.
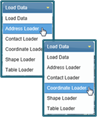
Click Load Data at the bottom of the window.
Click Address Loader or Coordinate Loader from the menu, depending on the type of data set that you are uploading. The Address or Coordinate Loader window appears.
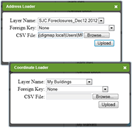
In the Address or Coordinate Loader window:
Layer Name: Select the name of the layer that you created for your Address or Coordinate data set.
Foreign Key: This option only applies when you reload a data set. (See Appending Data to an Existing Address or Coordinate Layer below.)
CSV File: Click the Browse button to select the csv file containing your Address or Coordinate data set.
Click the Upload button to load your data set into GovClarity™.
The Notification Area in the top right corner of GovClarity™ confirms the success of your data load. Click the Notification icon for information about the upload.
The Available list on the left of the Browse Layers window displays your new layer.
Tip: If your new layer is not in the Available list, select another folder from the Folder drop-down menu . Then re-select your original folder.
Note: You can append data to Address or Coordinate data sets you've loaded into GovClarity™. (See Appending Data to an Existing Address or Coordinate Layer below.)
Data Loader is in the Browse Layers window. To open the window, click the More Layers button at the bottom of Layers, as shown to the right.
In the Browse Layers window:
Select a folder from the Folder drop-down menu in which to save your data set.
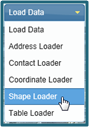
Click Load Data at the bottom of the window.
Click Shape Loader on the menu. The Shape Loader window appears.
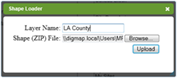
In the Shape Loader window:
Layer Name: Enter a name for your layer.
Note: The layer name does not support special characters. It supports upper and lower case letters and underscores.
Shape (ZIP) File: Click the Browse button to select the zip file containing your Shapefiles.
Click the Upload button to load your Shape data set into GovClarity™.
The Notification Area in the top right corner of GovClarity™ confirms the success of your data load. Click the icon for information about the upload.
The Available list in the Browse Layers window displays your new layer.
Tip: If your new layer is not in the Available list, select another folder from the Folder drop-down menu . Then re-select your original folder.
Updating an Existing Shapefile Layer
In the Browse Layers window:
Select the existing Shapefile layer in the Active list.
Click the Delete Layer button . A verification window appears.
Click the OK button to verify that you want to delete the layer.
Reload your updated Shapefile data set (See Loading a Shapefile above).
Appending Data to an Existing Address or Coordinate Layer
Requirement
Unique Identifier Field: Both your original and updated csv files must contain a field that is a unique identifier for each record (i.e.; it contains a value for each record that is unique and not repeated in the data set).
Appending Data to an Existing Address or Coordinate Layer
Alert: Do not create a new layer to append your data.
Click Load Data at the bottom of the Browse Layers window.
Click Address Loader or Coordinate Loader from the menu, depending on the type of layer that you are appending. The Address or Coordinate Loader window appears.
In the Address or Coordinate Loader window:
Layer Name: From the drop-down list, select the layer name that you created for the original Address or Coordinate data set.
Foreign Key: Select your unique identifier from the drop-down list.
CSV File: Click the Browse button to select your updated Address or Coordinate csv file.
Click the Upload button to load your data set into GovClarity™.
The Notification Area in the top right corner of GovClarity™ confirms the success of your data load.
Click the icon for information about the upload.
The Available list in the Browse Layers window displays your layer.
Tip: If your layer is not in the Available list, select another folder from the Folder drop-down menu . Then re-select your original folder.