|
LandVision™ Help > Documentation > Create Layer
|
|
Creating a layer is the first step in using Data Loader to:
- Load your spreadsheet Address or Coordinate data sets (csv files) into LandVision™
- Manually build a Spatial data layer. You create an empty layer in LandVision™, and can then manually add spatial data (points, lines, or polygons) and attribute information to your layer. This is a flexible way to create a Spatial layer for specific information tracking needs. (See Drawing Tools in Related Documents for information about drawing points, lines, or polygons.)
|
Preparing Address or Coordinate Data for Importing
|
It is important to correctly prepare your Address and Coordinate data sets (csv files) before loading them into LandVision™. The requirements in this section are for both Address and Coordinate data sets. Differences in requirements are noted.
Requirements
- Required File Type: Address and Coordinate data must be stored in Comma Delimited (*.csv) files.
- To save a database or spreadsheet file as a Comma Delimited file, perform a “Save As” and select “CSV (Comma Delimited) (*.csv)” for “Save as type.”
- Upload File Size Limit: 30MB
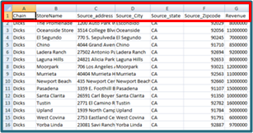
- Required Fields: Your Address and Coordinate *.csv files must contain, at a minimum, the exact fields below:
- Required Address fields: source_address, source_city, source_state, source_zipcode
- Required Coordinate fields: latitude, longitude
- Not Supported in Fields: Your csv file cannot include fields with these values:
- Field names: spaces, special characters, field names starting with numbers
Tip: Use underscores to replace the spaces in your field names.
- Currency (e.g., dollar signs)
- Commas
- Percent signs
- Character Limit in Fields: 100
- Reserved Field Names: Your csv file cannot include these field names: Key, Geometry, Sidx, _Cftid, _Geo_Type, _Dmp_Id, _Sessionid, _Recseq, _Createdby, _Createddate, _Retiredby, _Retireddate, _Status, _X_Coord, _Y_Coord, _Xmin, _Ymin, _Xmax, _Ymax, Unit, Address_number, Predirectional, Prefix, Street, Suffix, Postdirectional, UnitDesignation, City, StreetAbbr, Zipcode, Countycode, Geostatus, MatchStatus, State, Score, Parcel_id, AddressID, GEOMETRY_BIN, Opacity, Size, Color, Image, _SEQ_ID, _SYMBOLOGY, DRAW_TYPE, Location_ID.
- The full reserved keyword list can be found, here
|
Creating an Address or Coordinate Layer
Creating a Spatial Data Layer
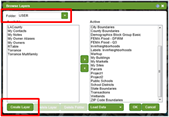
- Click the More Layers button
 at the bottom of the Legend. The Browse Layers window appears. at the bottom of the Legend. The Browse Layers window appears.
- Select a folder from the Folder drop-down list
 in which to save your data set. in which to save your data set.
Note: To create a new folder for your data set, select New. The Create Folder window appears. Enter the name of your new folder and click OK. Your new folder appears in the Folder drop-down list.
- Click the Create Layer button
 . The Create Layer window appears. . The Create Layer window appears.
Note: If you don’t have permission to use your selected folder, the Create Layer button is grayed out. Select another folder to save your data set.
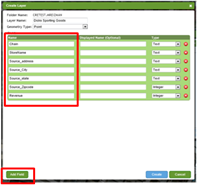
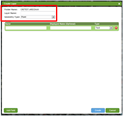
- In the Create Layer window:
- Folder Name: Automatically filled in with your selected folder name.
Note: The folder name starts with your LandVision™ Account name.
- Layer Name: Enter the name of your layer. You can use spaces and mixed cases.
- Geometry Type: Select Line, Point, or Polygon from the drop-down list, depending on the type of Spatial layer that you’d like to create.
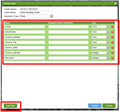
- Click the Add Field button
 to add attribute fields to your layer. to add attribute fields to your layer.
- Perform the following for each field:
- Name: Enter an attribute name.
- Displayed Name (optional): Not applicable
- Type: Select the data type from the drop-down list.
- Text: All text fields
Tip: If you don’t know the data type for a field, select Text.
- Integer: Whole numbers
- Decimal: Integers with decimals. You must select this data type for latitude and longitude fields.
- True / False: A conditional filter for certain data types
- Xml: Not applicable
- Click the Create Button
 . Your layer name appears in the Available list of the Browse Layers window. . Your layer name appears in the Available list of the Browse Layers window.
|
|
Related Information
|