|
Data Loader and Thematic Mapper give you a quick and easy way to import and thematically map outside data sets in LandVision™.
Data Loader lets you load shape and .csv files in a few simple steps so you can work with all your location-based data in one application, regardless of its source.
|
|
|
Loading Address Data
- Preparing your Address and Coordinate data for importing
- DMP’s Data Loader requires address and coordinate data to be stored in a Commas Delimited (*.csv) file.
- To save a database or spreadsheet file as a Comma Delimited file, simply perform a “Save As” and select “CSV (Comma Delimited) (*.csv)” for “Save as type.”
- DMP’s Data Loader requires certain fields to be included in your Address and Coordinate *.csv files. Your *.csv file
must contain the exact fields below:
- Required Address fields: source_address, source_city, source_state, source_zipcode
- Required Coordinate fields: latitude, longitude
- DMP’s Data Loader cannot recognize *.csv field names that contain spaces or special characters.
- DMP’s Data Loader has reserved field names which your *.csv file cannot include: Key.
- DMP’s Data Loader has an upload file size limit of 30MB.
- DMP’s Data Loader lets you append data sets. To do this, you need to have a field that’s a unique identifier for each record.
|
- Loading an Address Data Set
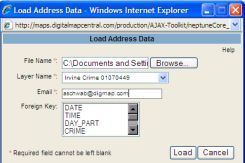
- Click on “Address Loader” from the Load Data heading. The “Load Address Data” dialog box will appear.
- Click on the “Browse” button to the right of the “File Name” input box to select your *.csv file containing your address data set.
- Select the layer you created for this address data set from the “Layer Name” pick list.
- Enter your email address to receive confirmation that your coordinate *.csv file has been successfully loaded and is ready for display in LandVision™.
- Click the “Load” button.
- A confirmation box will appear notifying you that your data load was successful.
- Once your address file is ready for display in LandVision™, you will receive an email at the email address you provided in the prior step. Note: your confirmation email may be delivered to your junk folder
|
|
- Appending Data to an Existing Address Layer
- If you would like to add or modify address data you’ve already loaded, you can do so using the “Foreign Key” field.
- Make sure your *.csv file contains a field that is a unique identifier for each record (i.e. it contains a value for each record that is unique, and not repeated in the data set). This field needs to be in your both your original *.csv file and your updated *.csv filed and must be mapped during the Create Layer step.
- When you are ready to append data to an existing layer, do not create a new layer and follow the steps above for loading address data. Make sure to pick your original layer from the Layer Name pick list.
- Select your unique identifier (aka Foreign Key) from the Foreign Key pick list.
- Click the “Load” button.
|
Loading Coordinate Data
- Preparing your Address and Coordinate data for importing
- DMP’s Data Loader requires address and coordinate data to be stored in a Commas Delimited (*.csv) file.
- To save a database or spreadsheet file as a Comma Delimited file, simply perform a “Save As” and select “CSV (Comma Delimited) (*.csv)” for “Save as type.”
- DMP’s Data Loader requires certain fields to be included in your Address and Coordinate *.csv files. Your *.csv file
must contain the exact fields below:
- Required Address fields: source_address, source_city, source_state, source_zipcode
- Required Coordinate fields: latitude, longitude
- DMP’s Data Loader cannot recognize *.csv field names that contain spaces or special characters.
- DMP’s Data Loader has reserved field names which your *.csv file cannot include: Key.
- DMP’s Data Loader has an upload file size limit of 30MB.
- DMP’s Data Loader lets you append data sets. To do this, you need to have a field that’s a unique identifier for each record.
|
- Loading a coordinate data set
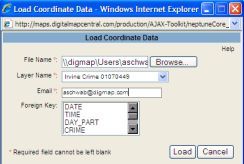
- Click on “Coordinate Loader” from the Load Data heading. The “Load Coordinate Data” dialog box will appear.
- Click on the “Browse” button to the right of the “File Name” input box to select your *.csv file containing your coordinate data set.
- Select the layer you created for this coordinate data set from the “Layer Name” pick list.
- Enter your email address to receive confirmation that your coordinate *.csv file has been successfully loaded and is ready for display in LandVision™.
- Click the “Load” button.
- A confirmation box will appear notifying you that your data load was successful.
- Once your coordinate file is ready for display in LandVision™, you will receive an email at the email address you provided in the prior step. Note: your confirmation email may be delivered to your junk folder
|
|
- Appending Data to an Existing Coordinate Layer
- If you would like to add or modify coordinate data you’ve already loaded, you can do so using the “Foreign Key” field.
- Make sure your *.csv file contains a field that is a unique identifier for each record (i.e. it contains a value for each record that is unique, and not repeated in the data set). This field needs to be in your both your original *.csv file and your updated *.csv filed and must be mapped during the Create Layer step.
- When you are ready to append data to an existing layer, do not create a new layer and follow the steps above for loading coordinate data. Make sure to pick your original layer from the Layer Name pick list.
- Select your unique identifier (aka Foreign Key) from the Foreign Key pick list.
- Click the “Load” button.
|
Loading Shapefile Data
- Preparing a shapefile for importing
- DMP’s Data Loader requires shapefiles to be in a zip file format. When adding your shapefile to a zip file, the
following files are required: *.shp, *.dbf, *.shx.
- DMP’s Data Loader has an upload file size limit of 30MB.
- DMP’s Data Loader requires shapefiles to be in unprojected format.
- If you are importing a shapefile you’ve extracted from your own GIS system, you have the option to extract
it as unprojected.
- If you are importing a shapefile you’ve received from another source, you need to verify it is in unprojected format. If it is projected, you need to use a GIS tool to reproject the shapefile to GCS NAD 1983.
- A free application available for reprojecting shapefiles is “Map Window GIS.” You can download Map Window GIS here
|
- Loading a shapefile
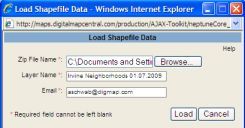
- Click on “Shape Loader” from the Load Data heading. The “Load Shapefile Data” dialog box will appear.
- Click on the “Browse” button to the right of the “Zip File Name” input box to select your zip file containing
your shapefile.
- Enter a name for your layer. This is the name that will be displayed for your layer in the LandVision™. Note: layer
name does not support special characters. Upper and lower case letters, spaces, and underscores are all supported.
- Enter your email address to receive confirmation that your shapefile has been successfully loaded and is ready for display in LandVision™.
- Click the “Load” button.
- A confirmation box will appear notifying you that your data load was successful.
- Once your shapefile is ready for display in LandVision™, you will receive an email at the email address you provided
in the prior step. Note: your confirmation email may be delivered to your junk folder
|
|

