|
LandVision™ Help > Documentation > Find And Evaluate Sites
|
LandVision™ Builder enables you to see local market trends over time to find the best areas for development. Find and evaluate Candidate Sites to discover the most suitable land acquisition opportunities before your competitors.
Here are a few of the important features of LandVision™ Builder:
- LandVision™ Builder automatically:
- Finds Candidate Sites within your Submarkets which contain adjacent parcels owned by the same owner, greatly reducing your workload, and increasing your acquisition opportunities.
- Scores Candidate Sites using a number of criteria including the amount of acreage suitable for development (taking into account wetlands, flood zones, topography); proximity to freeways, airports, and builder sites; and school ratings.
- LandVision™ Builder enables you to precisely define Submarkets on the map based on your needs to find and present acquisition opportunities to potential investors or capital allocation decision-makers.
|
Finding and Evaluating Candidate Sites Overview
This section describes the workflow to find and evaluate Candidate Sites.
- Create a Submarket
- Define your Submarket on the map with an easy-to-use drawing tool.
- Give your Submarket a name and description.
- Generate Sites
- Create your Acquisition Project:
- Name your project
- Select your Project Criteria.
|
- LandVision™ Builder automatically finds Candidate Sites within your Submarket by:
- Using your project criteria, And
- Intelligently scoring the Candidate Sites based on their suitability for development
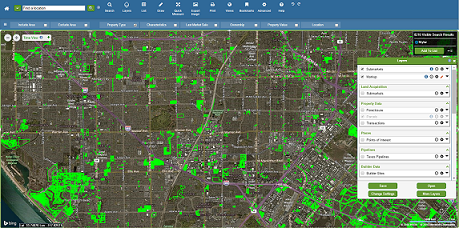
- Your Candidate Sites are displayed on the map as a layer, color coded by score, and your layer is listed in the Legend.
|
|
- Evaluate Your Candidate Sites
- Use your expertise to further qualify your Candidate Sites and target the best sites for acquisition.
|
Creating Submarkets
All of the submarkets that you draw on the map are added to the Submarket layer.
Here’s how to set up your Submarket layer:
- Click the Draw icon
 on the Main Toolbar. on the Main Toolbar.
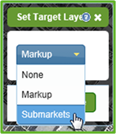
- Click Change Target Layer from the Draw menu. The Set Target Layer window appears.
- Select Submarkets from the drop-down menu on the window.
- Click the Ok button. The Submarkets layer appears in the Legend.
|

|
Here’s how to create a Submarket:
Note: See the section below, Tips for Defining Submarkets, for additional information.
|
- Click the Draw icon on the Main Toolbar.
- Click Draw Polygon on the Draw menu. The cross-hairs cursor appears.
Note: To cancel your drawing, click the Delete button  at the bottom of the map screen. at the bottom of the map screen.
- Here’s how to draw a polygon:
- Click the cross-hairs on the map to start your drawing.
- Let up on the mouse button, and move your mouse over the map to extend the line.
- Click at the end of the line to start a new side.
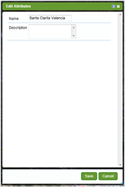
- After drawing the last side, double-click to complete the polygon. The Edit Attributes window and an editing toolbar appear.
|

|
- Enter the following in the Edit Attributes window:
- Name: Submarket name
- Description: Optional
- Click the Save button to create your Submarket.
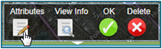
Note: To change your Submarket name or edit your Description, click the Attributes icon on the toolbar at the bottom of the map screen. The Edit Attributes window appears. (If the toolbar is not open, identify your Submarket by clicking on it.)
- Continue to the next section, Generating and Scoring Candidate Sites.
|
|
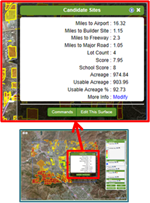
Evaluating Candidate Sites
Here are a few tips to help you validate the suitability of Candidate Sites for development:
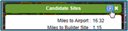
- Click on a Candidate Site in your Submarket. The Candidate Sites window appears. Use the various parameters in the window to interpret the suitability of the site.
- Click the Help icon at the top right of the Candidate Sites window for a description of the range of color-coded scoring of the Candidate Sites.
- Select Search Criteria using the Filter Bar to further analyze Candidate Sites. The Filter Bar is below the Main Toolbar. (See Search Filters in Related Documents for more information.)
- Run a search based on your Search Criteria. If desired, add your search results to the Results List, a tabular listing which provides a convenient way to view the attributes of the properties that match your Search Criteria. (See Results List in Related Documents for more information.)
- Use the Thematic Mapper to further your visual map analysis. (See Thematic Mapper in Related Documents for more information.)
|
|
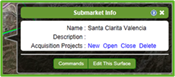
Managing Acquisition Projects
This section describes how to use the Submarket Info window to manage your Acquisition Projects in a Submarket.
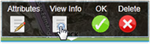
- Identify your desired Submarket by clicking on it. The editing toolbar appears at the bottom of your map screen.
- Click the View Info icon
 on the toolbar. The Submarket Info window appears. on the toolbar. The Submarket Info window appears.
- Select your desired option in the window:
- Click Open to select a shared Acquisition Project, or to open an Acquisition Project that you previously closed.
- Click Close to close an Acquisition Project.
- Click Delete to delete an Acquisition Project.
Note: Click New to create a new Acquisition Project in your Submarket.
|
|
Tips for Defining Submarkets
Although your Submarkets don’t have to match zip code or city boundaries, you can use those boundaries to draw Submarkets if desired.
Tip: To draw irregular lines, such as along a jagged boundary, draw many short line segments.
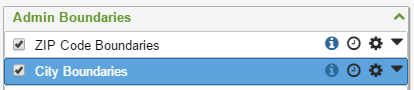
Note: The Blue Check  on a layer in the Legend means the layer is turned on. on a layer in the Legend means the layer is turned on.
Here’s how to define Submarkets by Zip Code Boundaries:
- If the Zip Code Boundaries layer in the Legend is not turned on, click the layer. Zip code boundaries appear on the map.
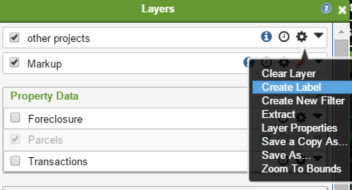
- To add zip code labels to the map:
- Click the Options icon
 on the Zip Code Boundaries layer. The Options menu appears. on the Zip Code Boundaries layer. The Options menu appears.
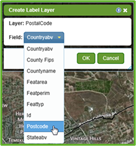
- Click Create Label on the menu. The Create Label Layer window appears.
- Select PostCode from the Field drop-down list on the window.
- Click the OK button. The map displays zip code labels, and the Legend displays the label layer with the name of your selected Field, PostCode.
Tip: It is the best practice to keep a label layer and its corresponding data layer together in the Legend.
- To edit the style of the labels on the map, such as changing the fill or line color, click the Options icon , and select Edit Style from the Options menu.
- Draw your Submarket along your desired zip code boundary.
Here’s how to define Submarkets by City Boundaries:
- If the City Boundaries layer in the Legend is not turned on, click the layer. City boundaries appear on the map.
Note: The Bing Map Labels layer in the Legend displays city names on the map.
- Draw your Submarket along your desired city boundary.
|

|
Related Information
|