COMMUNITYVIEW™ USER GUIDE
|
CommunityView™ Help > CommunityView™ User Guide
|
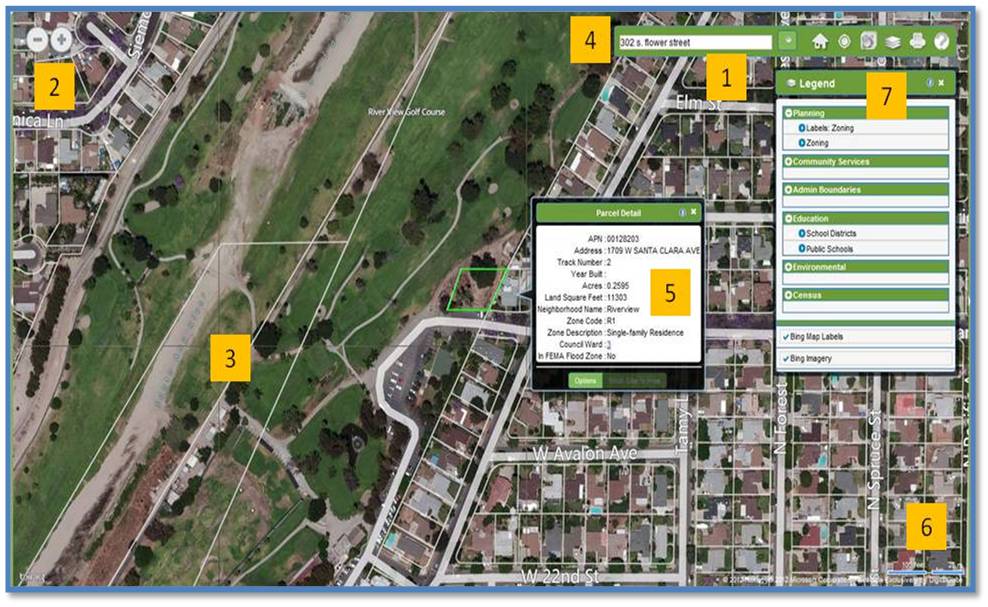
CommunityView™ is a web-based mapping application that enables local governments to publish relevant municipal information to the Internet for easy access by their residents. From the intuitive map interface, residents can quickly search for properties, zoom and pan around the map, view property details and community specific layers, and print maps and property details.
This user guide will provide an overview of:
|
|
- Search Box
- Zoom Icons
- Map Screen
- Toolbar
- Information Balloon
- Scale Bar
- Legend
|
|
|
Zoom Buttons
|

|
- Click on the plus (zoom in) or minus (zoom out) symbol icons
|
Mouse Wheel
- Move the cursor over a location and use the mouse wheel to zoom in or out to that location
- Roll the mouse wheel forward to zoom in, roll the mouse wheel back to zoom out
|
Mouse Double Click
- Place the cursor on the map where you want to zoom and double click the mouse. Each double click will zoom you in one zoom level and center the map on the location of your click
|
Zoom to a Rectangle
- While holding down the SHIFT key, place your mouse on the map screen in the upper corner of the area of the map you'd like to zoom into. With the SHIFT key still depressed, click and drag the mouse to draw a rectangle (will be visible onscreen) to the desired zoom area.
|
Panning
- Click the map screen and drag your mouse
|
Nudging
- Click the nudge bars on the perimeter of the map to incrementally move the map left, right, up, or down
|
Toolbar
|

|
|
The Toolbar contains the icons which will perform the following:
|
Search Box
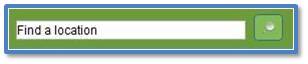
Enter an address to search for a location on the map and click on the magnifying glass to initiate the search.
Auto-complete: After typing in 3 or more numbers of an address, CommunityView™ begins to populate the matching results. To select any property from the auto-complete list, click on the address and the map automatically zooms to the property, and highlights and selects the property.
|

|
Home View
Click on the Home View icon to take you back to the initial zoom level
|

|
Find My Location
Select this icon to quickly zoom to the area where you are currently located (not available on all browsers, see below
|

|
Change Map
This tool changes the map view and provides pre-defined map themes with layers in common (e.g. the Parks Map would include park locations, trails, and other layers associated with that map theme)
|

|
Show Legend
Click on the Legend to display the Grouped Layers which will display in the map, such as Zoning, Parks, Street Sweeping, School Districts and more
|

|
Print Map
Select the Print icon to generate a PDF image of your map for printing
|

|
Help
Opens complete help documentation on how to use CommunityView™
|

|
FINDING PROPERTIES & LOCATIONS
|
There are two primary ways to search for properties and locations in CommunityView™:
- Perform a conventional search using the Search Box
- Perform a visual search by zooming and panning the map to find your desired location
|
Search Box
|
Search by an Address
- On the Toolbar, enter the street number and street name in the search box
|
|
Example: 123 Main St. (Note: there is no need to enter a city, state, or zip)
- Click the search icon

- The map will zoom to the address and outline the property in green
|
Search by APN
- Enter the APN in the "Search box" on the toolbar
- Make sure you use the format: apn: xxxxxxxx. Example: APN: 40016406

|
|
Search by a Street Intersection
- Enter the APN in the "Search box" in the upper left of the map screen
- Make sure you use the format: street name and street name
- Example: (Street 1 and Street 2)
|
Find My Location
|
| To zoom to the map area of your current location, click on the “Find My Location” icon on the Toolbar (your browser may prompt you to enable this functionality). CommunityView™ will zoom in and take you to the approximate area of your current location. The resulting zoom location will vary based on a number of factors including your device, GPS & others. Note, this feature is only available on HTML5 compatible browsers. CommunityView™ automatically detects whether your browser is capable of using this feature and will include it on the toolbar for all compatible browsers. For example, if you are using Internet Explorer 8, this feature will not be enabled because this browser is not built on the newest HTML 5 platform.
|

|
Map Search
|
| Pan the map to navigate to your desired location and zoom in until you see the property boundary lines appear. Click on the location to view the address, APN, and additional layer details in the Information Balloon. |
|
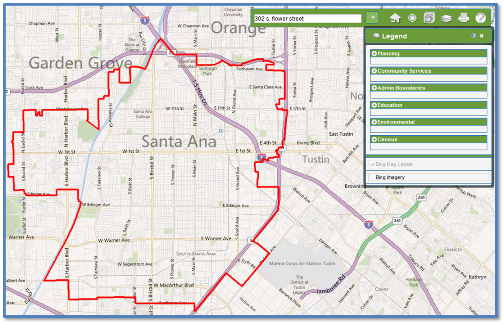
VIEWING LAYERS
|

|
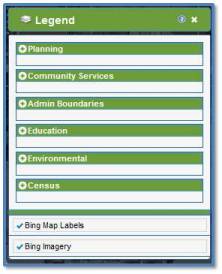
| The Legend provides you with various "layers" that are grouped by theme |
 |
|
Expand the group layer by clicking on (+) button in the legend. You can turn the layers on and off by clicking on the layer (look for the check mark to appear).
|
 |
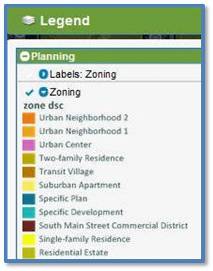
| You can also view the symbols for each layer by clicking on the arrow to expand the legend. This will provide additional information on what each color and/or symbol means when the layer is turned on in the map. |
When clicking on the Zoning Layer and the arrow icon ( ), the layer expands to display the legend detail which is reflected on the map. ), the layer expands to display the legend detail which is reflected on the map. |
|
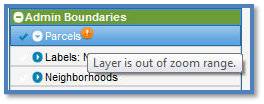
Legend Icon Alert
|
| If you see an orange exclamation point icon, this indicates that the layer is out of zoom range and you will need to zoom in to view the layer on the map |
|
Additional Base Layers
|
| Bing™ Maps |
| Scroll to the bottom of the Legend to select additional base map options. The default is for both the Bing™ Aerial imagery and Bing™ Labels to display. |

|
When the Bing™ Map Labels are turned off, the street labels disappear and you will just see the aerial imagery. When the Bing™ Imagery is turned off, the map will display the Street View. |
|
| Parcel Display |
| The Parcel or Property layer is turned on by default but only appears when you zoom in to the map. |
|
| Reminder: If you see an orange exclamation point icon next to the layer in the Legend, it indicates that the layer is out of range and you will need to zoom in to view the layer on the map |

|
IDENTIFYING PROPERTIES & VIEWING INFORMATION BALLOONS
|
| Identify A Property (Parcel) |
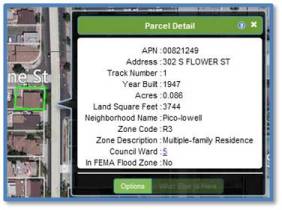
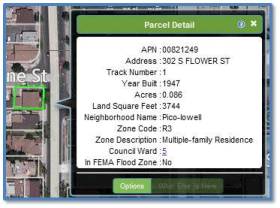
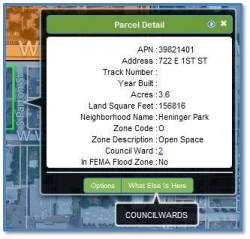
To identify a property, click on the property. The property outline will turn green and the Parcel Detail Balloon will appear. The property will remain highlighted until you identify another location by either entering a new search or clicking on another property.
The Parcel Detail Balloon contains the APN (Assessor's Parcel Number), Property Address, and additional information related to that property.
|
|
Reminder: "Home"  will take you back to the starting map screen with the city boundaries displayed on the map will take you back to the starting map screen with the city boundaries displayed on the map |
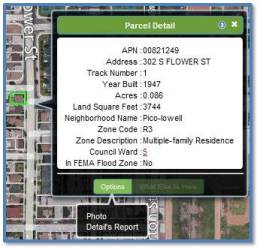
| Balloon Options |
| Photo |
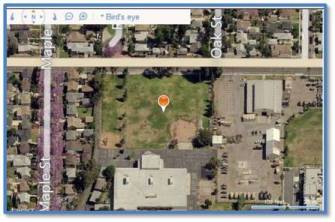
| To view a zoomed in image of the property, click on the "Options" link at the bottom of the Information Balloon and select "Photo". |
|
| A Microsoft® Bing™ window will appear with a zoom image of the property. You can select different views using the Bing™ toolbar |
|
| Details Report |
| You can create a property details report that includes detailed information about a selected property. A notification icon in the map indicates when a report is ready to view. The report is created as a PDF document which can be saved or printed. |
| Identify Other Layers |
To view additional information about a layer, view, or feature, click the layer or feature of interest (colored area, outline or point) and pause until the Information Balloon appears. NOTE: Some layers may not have additional information associated with the layer.
Some balloons have links to additional information. To access this additional information, (such as a website or PDF file) click the link in the information balloon.
|
|
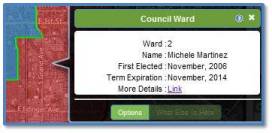
| What Else Is Here |
When selecting multiple layers to view on your map, you may have additional information to view for a specific location. To view that information, Click on "What Else Is Here" and select the option to view that information. In this example, we have two layers selected; Parcels and Council Wards.
After clicking on "What Else is Here?", you see a drop down showing a layer called Council Wards also at this location. When clicking on Council Wards, another window appears and we can now see details about that layer.
|
|
PRINTING
|

|
| When you select Print Map, the current map view on your screen will be captured as a PDF document. A notification will prompt you when the PDF is ready to open. At this point you will have the ability to save or print the PDF map. |
|
|
© Copyright 2018 Digital Map Products
|
 |
|