CONTENT SHARING
|
LandVision™ Help > Documentation > Content Sharing
|
Share your content with individual users, groups, or everyone in your LandVision™ account. You can share layers and styles, map compositions, saved results lists - anything in your LandVision™ folders for which you have write permission.
Tip: Before you share any folder, make sure that you want to share all the files in the folder. Move sensitive files to another folder. Or, create a new folder with only the files that you want to share.
|
Sharing Your Folders
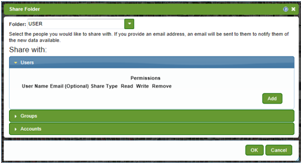
The Share Folder window enables you to share content with Users, Groups, and Accounts. The steps are the same for each, except the name formats are different:
- User Name: Account/User Name
- Group Name: Account/Group Name
- Account Name: Account
|
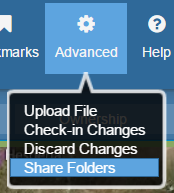
- Click the Advanced Menu icon in the Main Toolbar.
- Click Share Folders on the menu. The Share Folder window appears.
- Select the folder that you'd like to share from the Folder drop-down list
 . .
Tip: You can create a new empty folder for others to add content to. To create a new folder, select New from the Folder drop-down list. The Create Folder window appears. Enter the name of your new folder and click OK. Your new folder appears in the Folder drop-down list.
|
|
- Add people to share your folder with:
- Select Users, Groups, or Accounts. The Users area is open when the Share Folders window appears. Click the arrow
 next to Groups or Accounts to open one of those areas. next to Groups or Accounts to open one of those areas.
- Click the Add button
 . A row of fields appears. . A row of fields appears.
- Name: Enter a User Name, Group Name, or Account Name (See above for the name formats).
- Email (Optional): If desired, enter an email address to notify the recipient(s) that you have shared a folder.
|

|
- Note: The people that you share a folder with are notified in LandVision™ (See below for more information). Email is an extra notification method.
- Share Type: Accept the default, Allow, to share the folder. Select Deny to deny access to a folder that you have previously shared.
- Read: The default, Read, enables the sharer(s) of the folder to open its contents in LandVision™.
Note: Read does not give permission to edit shared files.
- Write: To give permission to edit shared files, check the box by clicking on it. The default (unchecked box) does not giver permission to edit shared files.
- Remove: Click the Remove button
 to remove the listing. to remove the listing.
Tip: If you might want to share the folder again with the same people, do not Remove the listing. Select Deny as the Share Type to deny access to the folder. In the future, select Allow to share the folder again.
|
- Repeat Step 4 above to add more people to share your folder with. In the example to the right, two Users, a Group and an Account have been listed to share a folder.
- Click OK to share the folder with the people you have listed.
|

|
Here's how the people that you share a folder with are notified:
- In LandVision™:
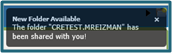
- A Notification Icon
 appears at the top right corner of LandVision™, and a Notification box appears for each folder shared. appears at the top right corner of LandVision™, and a Notification box appears for each folder shared.
- Click the Notification Icon to find out what has been shared. The New Folder Available window appears. The window contains links to the content of the shared folder. In the example to the right, the links are to Layers, Lists, and Map Compositions.
|

|
- Optional Email Notification:
- The email includes the name of the person sharing the folder, the name of the shared folder, and a link to view the shared folder in LandVision™.
Note: The shared folder is accessible in any window that provides access to folder, such as the Browse Layers window.
|
Related Documents
| |
