|
Advanced print allows you to customize your map with a title, footer, legend, and edit more details as well. Read more to learn how to use the Advanced Print functionality.
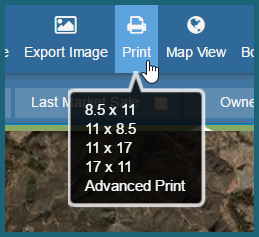
- Click the Print icon on the Main Toolbar. The Print menu appears.
- Click Advanced on the menu. The Report Settings window appears.
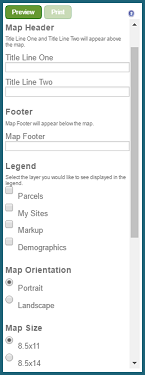
- Select your desired options from the Print Preview Balloon:
- Template: Select a template from the drop-down list
- Map Header: Insert a Title Line One as a primary title, and insert a Title Line Two as a secondary title. These titles will appear above the map.
- Footer: Insert a Map Footer to appear at the bottom of the map.
- Legend: Select your desired layers to be displayed alongside the map
Note: In order for the layers to display and therefore be selectable under the Legend section, the layers must be turned on in the Legend from the map screen.
Tip: The legend is limited in size to the vertical height of your print. If your legend is larger than the space available, remove some layers from your legend print selections.
- Map Orientation: Choose from a portrait or landscape orientation.
- Map Size: Choose from the following sizes: 8.5x11, 8.5x14, 11x17, 17x22, 22x34 or 44x34.
- Map Scale: Choose a unit of measure in feet: current view or 1 inch = 250 feet. Or, define a custom unit of measure.
- Search Results: Select whether you would like the current Search Results List (if applicable) to be included on your print out
|


|

