|
LandVision™ now has several enhanced printing options designed to allow you greater flexibility in
creating prints, all from a more intuitive interface that should diminish the rate of printing errors.
Produce both higher quality and larger format prints (up to E size), with fewer mistakes.
If you'd like to provide feedback regarding LandVision's™ BETA version of Enhanced Printing, please
email betafeedback@digmap.com.
|
|
Note:
Creating large format prints such as E-size requires a significant amount of system memory. We
recommend a computer with a minimum of 1.5 GB of memory for creating the largest prints with heavy
markups. However, the amount of memory required for printing depends on a variety of factors
including system configuration and the type of printer, so users will experience varying results.
|
|
TO USE:
|
- Important:
You must first install the latest version of Digital Map Products’ Desktop Integrator in
order to access the enhanced printing options. We recommend you check with your System Administrator
prior to installing any new programs.
|
- Desktop Integrator
- Install the .NET 3.0 runtime (one-time):
- .NET 3.0 requires the latest high priority Windows updates to run.
Click Here to
check for required updates. Select "Express" to get high-priority updates.
- To install .NET 3.0
Click Here.
- Click through any File Download and Internet Explorer Security Warnings by selecting
“Run.”
- If you already have .NET 3.0 installed, simply select “Repair" to ensure the required
.NET settings are in place.
|
- Install the latest version of Digital Map Products’ Desktop Integrator (one-time): Click Here
- Click through any File Download and Internet Explorer Security Warnings by selecting
“Run.”
- Read the End-User License Agreement and click “I Agree” to proceed with the
installation.
- Make sure the box to the left of “DMP Desktop Integrator” is checked and click
“Next.”
- Click Install.
- We recommend that you reboot your computer prior to using the new print features.
|
- Print Dialog Window
- To use the new print features, click on the “Print” icon from the Main Toolbar once you’ve
installed .NET 3.0 and the latest version of the Desktop Integrator.
|
- The print dialog box will open. You will also see a second web page load that reads “Loading
Enhanced Print.” This window needs to remain open in order to use the new print functionality.
You can minimize this window but do not close it.
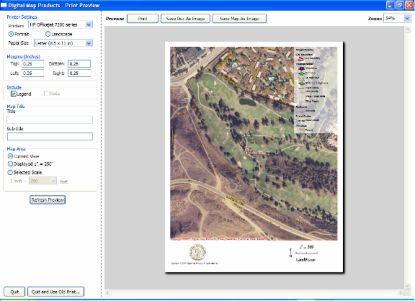
- Upon loading, a preview of your print will appear on the right. Depending on the size of your
print and number of layers on your map screen, your print preview may not load immediately.
A status bar will show you the amount of download remaining.
- Select your desired print settings (Printer, page orientation, & paper size).
- Choose your desired margins (minimum margin width is dependent on your printer).
- Choose whether you’d like to include the legend and/or data on your print by checking or
unchecking the boxes.
- If desired, enter a Title and Sub-title for your print (will display centered in the footer on
two lines).
|
|
- Define your map area.
- "Current View" will display the entire image on the map screen and will add additional
imagery to either the sides or top/bottom depending on page orientation to create a
full-page print.
- "Displayed" will display the image at the same scale as the image on the map screen.
- "Selected Scale" lets you input your own scale selections (choose from the drop down box
or input your own).
|
- You must click “Refresh Preview” to view your print formatting changes prior to printing or
saving the image.
- Select either "Print," "Save Doc as Image" (exactly as shown in print preview), or "Save Map as
Image" (map image only).
- To create a large format png image:
- Select a printer capable of large format printing or a PDF writer from the
Printers drop down box, or if you don't have a printer capable of large format
prints or Easy PDF installed, you will need to select "Microsoft XPS Document Writer."
- Once you've selected the XPS driver, you can then select a large format print
size from the "Paper Size" drop down box.
- Once you've formatted the print image to your specifications and clicked
"Refresh Preview," you can click the "Save Doc as Image" or "Save Map as Image"
button to create a png file of your map image.
|
- To create a PDF image:
- Due to known print issues between Adobe and Microsoft's WPF technology, we do
not currently recommend using "Adobe Acrobat" to print LandVision™ images to PDF. With
Adobe Acrobat, some print sizes will be unavailable. We recommend using "Easy PDF"
so you will have the full range of pdf print sizes. "
- To download Easy PDF
Click Here
- You can download a trial version which will include a watermark on printed
images, or you can purchase a 1 year license for $15.
|
- Note:
- In order to change "Print Preferences" (color, print quality, paper tray...) for a LandVision™
print, you need to make these selections prior to initiating a print from LandVision™.
- Select "Printers and Faxes" from your Control Panel.
- Right click the printer you would like to use to print your LandVision™ image.
- Select "Printing Preferences."
- Change your preferences and click "Apply" and then click "OK."
- Don't forget to change your preferences back when you are finished printing in LandVision™.
|
- Due to known issues with Microsoft's XPS print driver, we do not recommend using "Microsoft XPS
Document Writer" for printing. We currently only recommend using "Microsoft XPS Document Writer"
to create a large format png file.
|

