POINTS OF INTEREST DATA
|
LandVision™ Help > Documentation > Points of Interest Data
|
LandVision™ provides you with a rich resource of Points of Interest (POI) data to easily display on the map for research and presentation purposes. In a just a few clicks, you can discover and further analyze your subject site based on its surrounding POIs. LandVision™ offers two ways to seach for POI data:
- Points of Interest Search: Displays specific points of interest on the map and can range from businesses, restaurants, big box stores, retailers, parks, attractions and more. These points are represented by a POI icon, in which the default POI Layer icons are blue
 , and the POI Search Filter icons are green , and the POI Search Filter icons are green  . .
To fit your specific needs, you can copy and modify any pre-defined style to create a new style. You can also create custom searches with POI search filters. Your search results enable you to expand the uses of POI data.
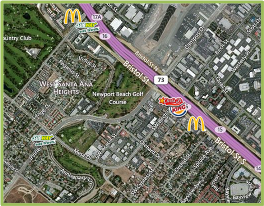
- POI Search - Major Brands: Displays most major brands including retailers, restaurants, hotels, gas stations, and more. These points are represented by brand logos placed automatically for you on the map.
|
Using the Points of Interest Search Filter
|
|
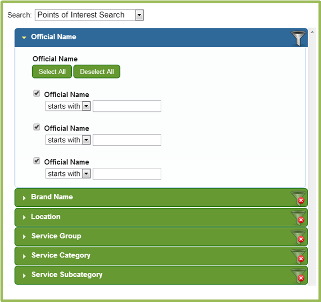
- Click on the Search icon from the Main Toolbar. The Search Filter window appears.
- Select Points of Interest Search from the Search drop down menu.
- Select your desired search filter criteria with the following search filter options:
- Official Name/Brand Name: Official Names or Brand Names can be searched for using the following conditions: starts with, is, is not, ends with, contains, is empty and is null.
- Location: POIs can be searched for by their City, Zip or Street Name using the following conditions: starts with, is, is not, ends with, contains, is empty and is null.
- Service Group: POIs can be searched for by their classified Service Group. Filter by one or more service groups by selecting the respective radio button.
- Service Category/Service Subcategory: POIs can be searched for by their service or subservice categories (e.g. Dentist) using the following conditions: starts with, is, is not, ends with, contains, is empty and is null.
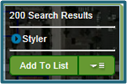
- Click OK to run your POI search. Your search results appear as green POI icons on the map screen and are counted in the Search Results box.
Tip: Use the Search Filter Bar to quickly adjust your search filter criteria. It is below the Main Toolbar. Hover over a tab, such as Brand Name, to open a drop-down list with search filter criteria.

|
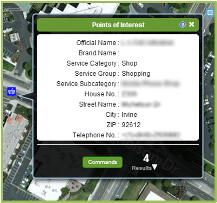
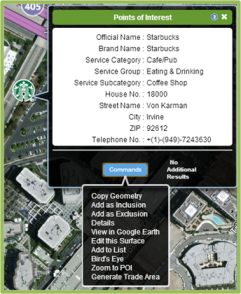
- Click on any POI icon on the map screen.
- When the POI window displays, click the Command button for a variety of POI options (See Commands Menu Options below for more information).
|
|
Using the POI Search - Major Brands
|
|
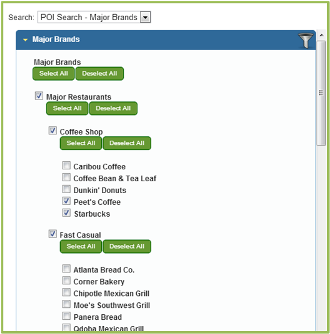
- Click on the Search icon from the Main Toolbar. The Search Filter window appears.
- Select POI Search - Major Brands from the Search drop down menu.
- Select your desired search filter criteria with the following search filter options:
- Major Brands: Commonly-known brands can be selected by name. The options are categorized by type such as Coffee Shop, Fast Food, Full Service, Grocery, Home Improvement, etc. At the bottom, there are also options for 1) Additional Retail such as Automotive, Gas & Convenience and Pharmacy; and 2) Other: Enter custom brand names in the text fields provided.
- Category: Shows all brands within a certain category, such as Department Stores, Lodging, Restaurants, and more.
- Location: Use this filter to restrict your search to a specific City, Zip Code, or Street Name.
Note: To ensure search results, do not use a Category filter when selecting specific names.
- Click OK to run your POI search. Your search results will appear as brand logos on the map. The Search Results Box will also be updated to reflect your results.
Tip: To generate a map exhibit that showcases desirable amenities surrounding your site subject, create a Quick Map Exhibit within a few clicks.
Note: Use the Search Filter Bar to quickly adjust your search filter criteria. It is below the Main Toolbar. Hover over a tab, such as Brand Name, to open a drop-down list with search filter criteria.
|
- Click on any brand logo on the map screen.
- When the POI window displays, click the Command button for a variety of POI options (See Commands Menu Options below for more information).
|
|
Using the Points of Interest Layer
Here's how to select a pre-defined POI style:
- Turn on the Points of Interest layer by clicking on the layer in the Legend. The blue check means the layer is turned on.
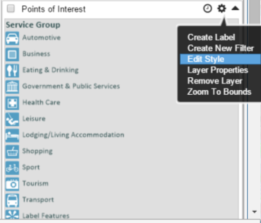
- Click the Options icon on the Points of Interest layer in the Legend.
- Click Edit Style in the menu. The Style Editor appears.
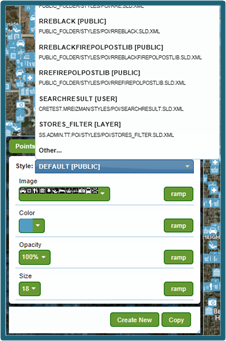
- Click the Style drop-down list to select a style (See Thematic Mapper in Related Documents for information about styling data).
Tip: To scroll through the styles in the Style drop-down list one at a time, use the up and down arrow keys on your keyboard.
Here's how to copy a pre-defined POI Style:
- Select the style which you’d like to copy in the Style drop-down list of the Style Editor.
- Click the Copy button
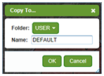
 at the bottom of the Style Editor. The Copy To...window opens. at the bottom of the Style Editor. The Copy To...window opens.
- Select the Folder to save the copy of the style.
- Enter a new Name for the style. You must change the name of the original style to copy to the folder it is saved in. The style name does not support special characters. It supports upper and lower case letters, spaces and underscores.
Tip: Select another folder if you would like to save a copy of the original style without changing its name.
- Click the OK button. The copy of the styles appears in the Style drop-down menu. You can now format the visual attributes of the style if desired.
| 
|
Commands Menu Options
|
Copy Geometry: Copies the selected record's geometry to another layer.
Add as Inclusion/Exclusion: See Related Documents.
Details: Displays more information about the selected POI.
View in Google Earth: See Related Documents.
Edit this Surface: Customize the window to your preferences.
Add to List: Adds the POI to the Results List.
Bird's Eye: Opens a bird's eye view of the selected POI in a separate window.
Zoom to POI: Zooms the map view to the POI.
Generate Trade Area: Enables users to generate a single trade area from a single POI, or many trade areas from a list of POIs. (See Related Documents.)
|
 |
Related Documents
|
|
| | | |