|
GovClarity® Help > Documentation > Address Management
|
|
The process of Address Management is a critical activity for all local governments. GovClarity® enables local governments to create a more comprehensive database of property information by adding and editing Custom Addresses (e.g., City Supplemental Addresses).
|
Address Management Overview
You can add Custom Addresses for properties and locations. Any object that requires a permit requires an address. Here are some common examples:
- Properties with Multiple Addresses: Strip malls are often in the assessors tax roll as one parcel and one address; however, for various reasons, such as permitting and public safety, this is not adequate to meet departmental needs.
- Non-property Areas: Electrical transformers, bus stops, fire hydrants, water meters, etc.
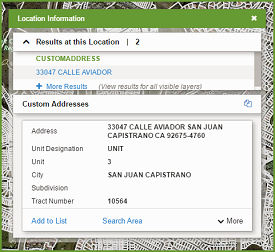
Tip: To search for a Custom Address, use the Locate Search field:
- Begin typing an address in the Locate Search field. The auto-complete menu displays.
- Click a Custom Address. GovClarity® zooms to the address and displays the Custom Address panel. You can use the Panel to verify and edit the information that you entered.
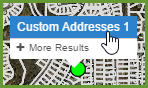
All of the Custom Addresses that you add in GovClarity® display in the Custom Address layer as point icons when the layer is turned on.
- Hover and Click the address point icon to open the Custom Address Panel.
- You may have to select More Results if the tooltip is off.
|


|
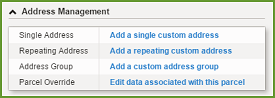
Adding a Single Address
The Add Single Custom Address command enables you to add a Custom Address and include the information in the address database.
Note: See the sections below, Adding Repeating Addresses and Adding an Address Group, to add more than one Custom Address to a parcel.
- Make sure that the Custom Address layer in the Layers Panel is turned on and is identifiable.
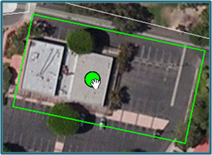
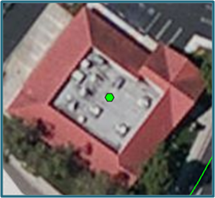
- Click on the parcel to add a Custom Address. The Location Information Panel opens.
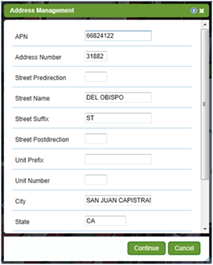
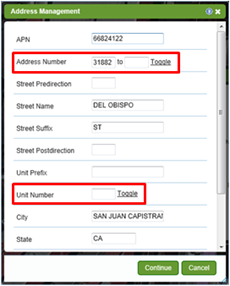
- Click Add Single Address from the Location Information Panel. The Address Management window opens.
- Enter information for the Custom Address:
- Street Predirection: For example, 1234 South Main St.
- Street Postdirection: For example, 1234 Main St. South
- Unit Prefix: See the section below, Required Unit Prefixes.
- Unit Number: Numeric value required
- Click the Continue button. A point icon displays.
- Click the map where you'd like to add the Custom Address. A confirmation message displays.
- Click OK.
See the section below, Editing Custom Addresses, to edit the attributes of a Custom Address.
|
|
Adding Repeating Addresses
The Add Repeating Addresses command enables you to add multiple Custom Addresses at specific locations, and include the information about each address in the address database.
Tip: Use the Add Address Group command to add a group of Custom Addresses without specifying each address or unit location. (See the section below.)
- Make sure that the Custom Address layer in the Layers Panel is turned on and is identifiable.
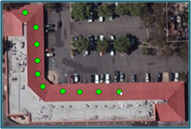
- Click on the parcel to add Repeating Custom Addresses. The Location Information Panel opens.
- Click Add Repeating Addresses command from the Address Management card. The Address Management window opens.
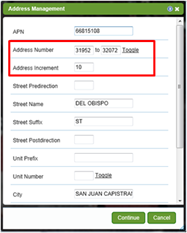
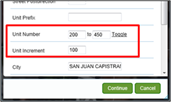
- Enter information for the Repeating Addresses:
Note: Click Toggle to switch between the Address Number and Unit Number fields.
- Address Number: The range of address numbers
- Address Increment: The increment for each address number.
- Unit Number: The unit number range
- Unit Increment: The increment for each unit number.
- Street Predirection: For example, 1234 South Main St.
- Street Postdirection: For example, 1234 Main St. South
- Unit Prefix: See the section below, Required Unit Prefixes.
- Unit Number: Numeric value required
- Click the Continue button. A point icon displays.
- Click the map repeatedly where you'd like to add the Custom Addresses. After you add the last point icon, a confirmation message displays.
- Click OK.
See the section below, Editing Custom Addresses, to edit the attributes of Custom Addresses.
|
|
Adding an Address Group
The Add Address Group command enables you to add a group of Custom Addresses without specifying each address or unit location, and include the information about the group in the address database.
- Add address groups to apartment buildings.
Tip: Use the Add Repeating Addresses command to add multiple Custom Addresses at specific locations. (See the section above.)
- Make sure that the Custom Address layer in the Layers Panel is turned on and is identifiable.
- Click on the parcel to add an Address Group. The Location Information Panel opens.
- Click Add Address Group command from the Address Management card. The Address Management window opens.
- Enter information for the Address Group:
Note: Click Toggle to switch between the Address Number and Unit Number fields.
- Address Number: The address number range
- Unit Number: The unit number range
- Street Predirection: For example, 1234 South Main St.
- Street Postdirection: For example, 1234 Main St. South
- Unit Prefix: See the section below, Required Unit Prefixes.
- Unit Number: Numeric value required
- Click the Continue button. A point icon displays.
- Click the map where you'd like to add the Address Group. A confirmation message displays.
- Click OK.
See the section below, Editing Custom Addresses, to edit the attributes of Custom Addresses.
|
|
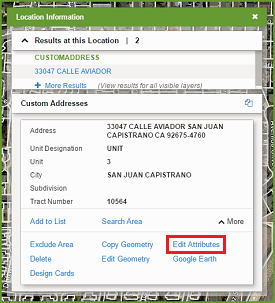
Editing Custom Addresses
To edit the information for a Custom Address:
- Search for a Custom Address, or identify it on the map to open the panel.
- Click the Edit Attributes command. The Edit Attributes window opens.
- Edit the Custom Address.
- Click Save.
|
|
Required Unit Prefixes
|
Apartment
|
APT
|
|
Building
|
BLDG
|
|
Basement
|
BSMT
|
|
Department
|
DEPT
|
|
Floor
|
FL
|
|
Front
|
FRNT
|
|
Hanger
|
HNGR
|
|
Lobby
|
LBBY
|
|
Lot
|
LOT
|
|
Lower
|
LOWR
|
|
Office
|
OFC
|
|
Penthouse
|
PH
|
|
Pier
|
PIER
|
|
Rear
|
REAR
|
|
Room
|
RM
|
|
Side
|
SIDE
|
|
Slip
|
SLIP
|
|
Space
|
SPC
|
|
Suite
|
STE
|
|
Stop
|
STOP
|
|
Trailer
|
TRLR
|
|
Unit
|
UNIT
|
|
Upper
|
UPPR
|
Related Information
|