|
GovClarity Help > Documentation > Issue Reporting
|
|
GovClarity™ provides an all-in-one Constituent Engagement and Issue Reporting solution with its Connect mobile app. Residents can quickly report issues, such as potholes and graffiti, stay current on their city's latest news, learn about upcoming city events, or even look up city information, all via an easy-to-use mobile application. Your agency controls and manages reported issues directly in GovClarity™ for quick resolution and tracking. |
Issue Reporting Overview
- Constituents report issues via the Connect mobile application or through CommunityView™ on their PC.
- New issues may be assigned to agency staff for resolution in two ways:
- Auto-assignment based on the specific issue reported. Or,
- A dispatcher is notified of the new issue and creates a work order that assigns the issue to the appropriate employee(s) for resolution.
Note: Newly reported issues are automatically added to the Issue Report layer in Layers. Icons identify new and existing issue locations on the map.
- Agency staff work to resolve their assigned issues.
- When an issue is resolved, Connect and CommunityView™ (if applicable) is updated with the resolved status of the issue.
Note: If desired, staff may communicate with the individual(s) that reported the issue.
|
|
Creating a Work Order
This section describes how a dispatcher handles new issues:
- The dispatcher is notified of new issues by email and in the Notification Area of GovClarity™, which is in the top right corner of the map screen.
- The dispatcher creates a work order that assigns one or more new issues to the appropriate employee(s) for resolution.
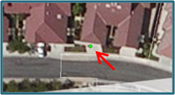
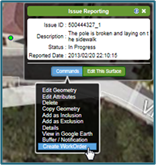
- When you are ready to create a Work Order, click an Issue icon on the map that identifies a new issue. The Issue Report window appears.
Note: In the example to the right, the Issue icon is a green circle. The Issue icons you view on the map may be different.
- Click Commands on the Issue Report window.
- Click Create WorkOrder on the Commands menu. The cursor appears as cross-hairs.
- Draw a polygon around the Issue icon on the map that you identified.
Note: If desired, you may draw the polygon around more than one Issue icon, for example, if the icons on the map represent the same issue reported by multiple people. The Work Order pertains to all issues inside the polygon.
- Here's how to draw a polygon:
- Click the cross-hairs on the map to start your drawing.
- Let up on the mouse button, and move your mouse over the map to extend the line.
- Click at the end of the line to start a new side.
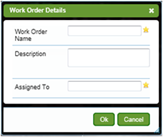
- After drawing the last side, double-click to complete the polygon. The Work Order Details window opens.
- Enter the appropriate information in the Work Order Details window:
- Work Order Name: Enter a unique Work Order Name. A required field.
- Description: Not a required field.
- Assigned To: Assign the appropriate employee(s) to resolve the issue. A required field.
Note: A city employee might assign the issue resolution to himself. For example, this might occur when the employee is responsible for the particular issue.
- Click OK in the Work Order Details window to create the Work Order.
- A window appears that confirms the creation of the Work Order. It displays the Work Order Id.
- Your staff assigned to resolve the issue is notified of the new issue.
- Click OK in the confirmation window.
|
|
Resolving New Issues
Municipal staff assigned to resolve new issues are notified of their assignments by email and in the Notification Area of GovClarity™, which is in the top right corner of the map screen.
Here's how to resolve a new issue:
- Click the Notification icon in the top right corner of the map screen. A window opens to resolve the issue.
|
Related Information
|