-
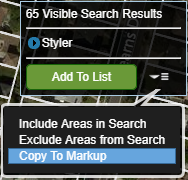
Run a search that contains the properties you'd like to tie to a new markup layer.
- Click the down arrow in the Search Results box in the top right corner of the map.
- Select Copy to Markup from the menu. The Layers menu displays your new markup layer, for example, Search Results: Property Search.
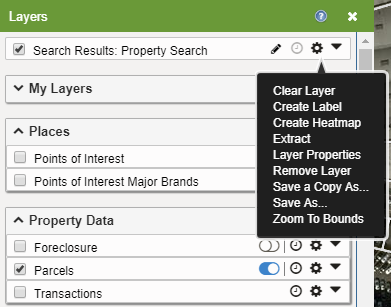
Note: Your new layer is temporary unless you save it.
- To save your new markup layer:
- Click the Options icon
 to the right of the layer name. to the right of the layer name.
- Click Save as... in the menu. The Save Layer As... window opens.
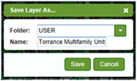
- Select a Folder to save the layer.
- Enter the Name of the layer.
- Click the Save button. The Layers menu displays your saved layer.
The Drawing icon  identifies the layer as the target layer. You can draw on it, and place icons, labels, and overlays using the Drawing Tools in LandVision (See Related Documents below). identifies the layer as the target layer. You can draw on it, and place icons, labels, and overlays using the Drawing Tools in LandVision (See Related Documents below).
Note: The Layers menu deletes the temporary markup layer when you close LandVision.
|
|
