|
LandVision™ Help > Documentation > Edit Style Of Search Results
|
|
Use the Edit Style option to enhance the display of your search results from your results list, with a few quick steps.
Tip: A common use of this feature is to visually differentiate each search you run. For example, you might assign the color red to display sales comparables on one map, and the color green to display your prospecting list on another map of the same area of interest.
Note: This document does not describe the ramp buttons  on the Style Editor. These buttons open the Style Editor, a powerful classification tool for advanced visual map analysis (See Styling Your Map for more info). on the Style Editor. These buttons open the Style Editor, a powerful classification tool for advanced visual map analysis (See Styling Your Map for more info).
|
Editing Style
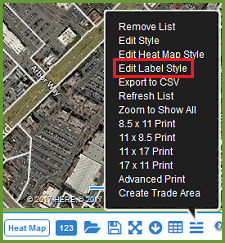
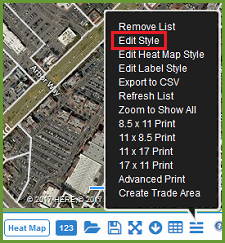
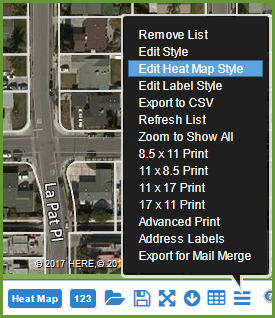
- Click the Options icon
 at the top right corner of the Search Results list. at the top right corner of the Search Results list.
- Click Edit Style in the menu. The Style Editor opens.
Note: The Style Editor options depend on the focus of your search. Each search creates a layer with only one geometry type. For example, a Property Search creates a layer with polygons only, and a Points of Interest Search creates a layer with points only.
|
|
Here are the Style Editor options for polygons, points, and linear shapes:
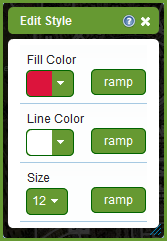
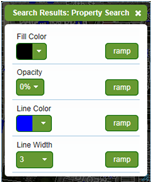
- Styling Options for Polygon Search Results
There are four options to modify the visual map display of your search results
Fill color: Select a fill color for the numbered search results on the map, such as, parcels.
Warning: The Fill Color and Opacity options work together. The default opacity is 0%. A fill color with 0% opacity is not visible on the map. To make the fill color visible, set the opacity above 0%.
Opacity: Select the opacity of the fill color. The range of opacity is 0% (no fill color visible) to 100% (solid fill color). If you want to see fill color in the numbered polygons on the map, the best practice is to set the opacity to at least 30%.
Line Color: Select the color of the lines that outline each polygon.
Line Width: Select the width of the lines that outline each polygon.
|
|
- Styling Options for Point Search Results
There are four options to modify the visual map display of your search results:
Image: Select an image for the numbered search results on the map. The menu provides various images, for example landmarks
Color: Select a color for the images on the map.
Opacity: Select the opacity of the image color. The default opacity is 100% (solid color). If you set the opacity to 0% the color becomes invisible. The range of opacity is 0% (no color visible) to 100% (solid color).
Size: Select the size of the images on the map. The size range is 0% (smallest) to 100% (largest).
|

|
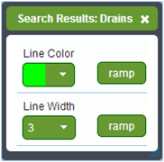
- Styling Options for Linear Shape Search Results
There are two options to modify the visual map display of your search results:
Line Color: Select a line color for the numbered search results on the map, which identify linear shapes such as pipelines and roads. The default line color is bright green.
Line Width: Select a line width.
|
|
Edit Label Style
Editing the Results List Heatmap Style
|
If you generated your heatmap from the results list, follow these steps to edit the style of your heatmap to change the appearance of it.
- Click on the Results List options icon and choose the Edit Heatmap Style option. The style editor window will open.
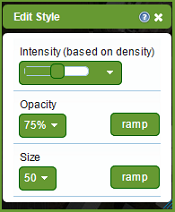
- With the style editor window open, you have the option to edit the Intensity, Opacity, and Size.
- Intensity: Changes the weight of each point.
- Opacity: Selects the translucence of the layer.
- Size: Affects the size of the heatmap around each feature on the map.
- When you're done editing the style. Close the window, and the style will save for you automatically.
Click here to learn more about Heatmaps.
|
|
Related Information
|