|
LandVision™ Help > Documentation > Contact Management
|
Contact Management is an integrated solution to store, organize, and access your property and contact information. As a result, you can reveal new opportunities by better understanding and tracking your market, spend less time organizing information, and benefit from a centralized database that is conveniently at your fingertips, both in the office as well as out in the field.
Tip: Contact and Property Details can also viewed on LandVision™ Connect, the mobile app for brokers out in the field. For more information on LandVision™ Connect, refer to the Related Documents section.
|
Importing Contact Data from Microsoft® Outlook
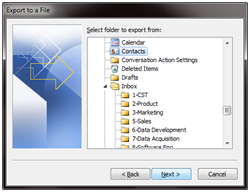
- Export your contact from Microsoft® Outlook as a Comma Separated Value (CSV) file
- To get to Outlook's Export Feature using...
- Outlook 2010
- Click File, then Options, then Advanced, and then locate the Export section and click the Export button
- Outlook 2007 and 2003
- To export Contacts select Export to a file, then Comma Separated Values, and then select the Contacts folder from the Outlook location tree
|
|
- Import your Contacts into LandVision™
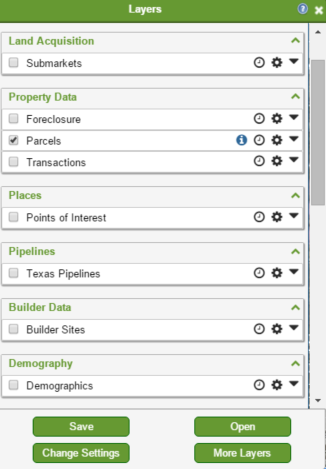
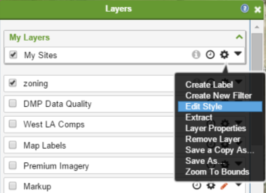
- Open the Layers by clicking the icon located on the Main Toolbar
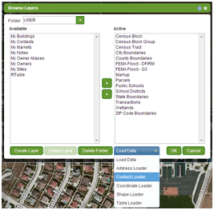
- Click More Layers
- Select the USER folder in the drop down menu located in the top right corner of the window
- Expand the Load Data menu and click Contact Loader
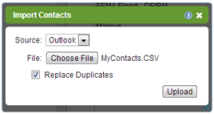
- Select the contacts file previously exported from Outlook (check Replace Duplicates if desired), then click Upload
|
|
|
Note: Upon successfully loading records to the My Contacts layer, the notification area located in the top right corner of the browser window will display an icon and brief status pop-up.
- To use the My Contacts layer please see the My Sites and My Buildings sections below
|
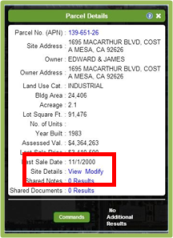
Adding a New Contact to a Site
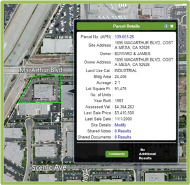
- Select a site on the map.
- In the Parcel Details window, locate Site Details and click Modify.
|
|
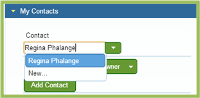
- In the Edit Site window, scroll to the My Contacts section.
Adding an existing contact:
- From the Contact drop-down menu, select the name of the contact you'd like to add to the site.
- From the Relation to Site picklist, select their role (e.g. Owner, Investor, Manager or Other).
- Click Add Contact.
|
|
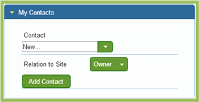
Adding a new contact:
- From the Contact drop-down menu, select select New.
- In the Edit Attributes window, populate the contact's information. Click Save.
- Returning back to the Edit Site window, select your newly entered contact name from the Contact drop-down menu.
- Choose the role of the contact you would like to add by their title (e.g. Owner, Investor, Manager or Other.)
- Click Add Contact.
|

|
- Select OK at the bottom of the Edit Site window. Your contact is now saved under your desired site.
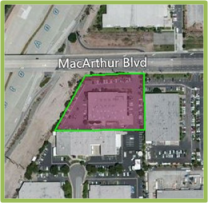
- The site will then turn purple as default to indicate you have entered in custom information pertaining to that site location.
Tip: To add multiple contacts with the same title to a single parcel, click the Add Owner button again. An additional name field will appear to enter in an additional contact.
|
|
Searching for a Contact
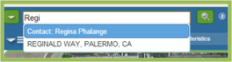
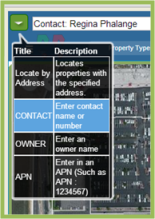
- In the Locate Bar at the top left of the LandVision™ screen, type in the name of the contact you are searching for. Select the correct name that is auto-populated for you.
Tip: An alternative way to search exclusively for contacts is to select Contacts in the drop-down menu located to the left of the Locate Bar. This will add a ‘Contacts' prefix to your search and will only provide Contacts' results.
Note: You can also search for a contact by their phone number.
|
|
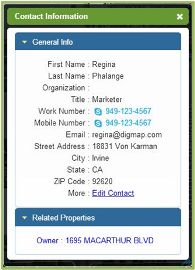
- A Contact Information window will appear to show the General Information and any Related Properties that contact is linked to.
Tip: You can edit the contact's information by clicking on Edit Contact, or, if there are any Related Properties listed, by clicking on the address to view additional Parcel Details.
|
|
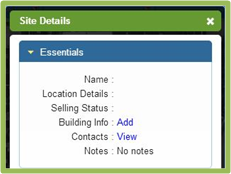
Viewing Contacts Related to a Site
- Select a site on the map.
- In the Parcel Details window, locate Site Details and click View.
- In the Site Details window, under the section Essentials, click View to the right of Contacts.
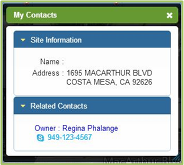
- From the My Contacts window, the site and contact information will display.
|
|
Related Information
|