|
LandVision Help > Documentation > Connect for LandVision CRE
|
Connect for Landvision CRE is a mobile app designed from the ground up to make it easier than ever for brokers to access critical LandVision information and fulfill key workflows while out in the field. Using a simple smartphone interface that automatically syncs with LandVision Commercial, you can quickly and easily:
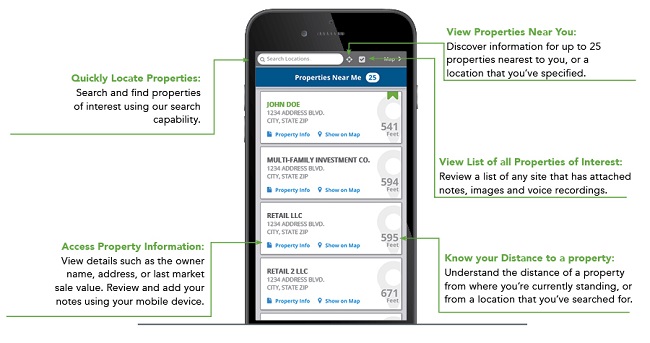
Access Property Information - View LandVision data on nearby properties, including automatically-updated information as well as any site details, notes or data you or your support staff have entered on a property.
Connect with Contacts - Call, e-mail, or text message contacts with a single tap.
Capture Field Information - Build and organize your market knowledge by storing valuable field information such as property photos, notes and voice memos that automatically sync with LandVision Commercial.
|
|
Note: Connect for Landvision CRE is only available through a LandVision Commercial Real Estate subscription. Data synchronization will occur automatically so that your data is viewable in both locations.
|
Viewing Properties and Contacts
Note: To view your contacts in LandVision Connect, refer to the Contact Management section. This section will provide instructions on how to enter in contacts and link them to your properties to view them on your smartphone.
You cannot be logged into LandVision and LandVision Connect concurrently. Once you log into one application, your session will expire in the inactive application.
|
- Launch the app by tapping on the LandVision Connect icon on your iPhone device.
Note: If you are logging in for the first time, a registration screen will display. Enter in your LandVision Commercial credentials. Hit Done.
|
|
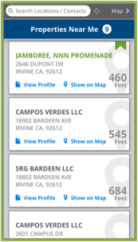
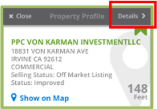
- The first screen will display up to 25 properties based on the proximity of your active location. Summary information will be displayed for each property on the Property Card.
- Click on View Profile from the to view a Property's details.
Tip: Click on Map > at the top right-hand corner to view properties on the map. Select < Back to return to the list view.
|
|
|
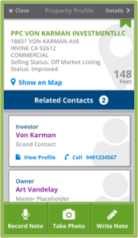
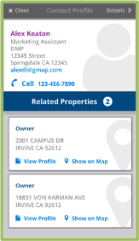
- From the Property Profile screen, the property details will display. If there are any Related Contacts linked to this property, the number of Contacts will also display, along with summary information.
- To view a Contact, click on View Profile from the Contact’s Summary. The Contact Profile will appear and will display additional information about the contact, and any related properties that this contact may be linked to.
|
|
|
Adding a Text Note, Voice Memo or Photo to a Property
- From the property results' screen, locate the desired property to which you would like to add a text note, voice memo or photo. From the property card, select View Profile.
|
|
- From the bottom of the Property Profile screen, select either Record Note, Take Photo, or Write Note button.
- Record Note: Tap to record a voice memo. LandVision Connect will open the native recording functionality on your smartphone. Select Done when you have finished recording.
- Take Photo: Tap to take a photo of a property. LandVision Connect will open the native camera functionality on your smartphone. Select Use to save your photo.
- Write Note: Tap to write a text note. To begin writing your note, tap anywhere on the note screen provided. The smartphone keyboard will appear. Select Done on your smartphone keyboard when you have finished typing. Select Done again on the upper right hand corner to save your note.
|
|
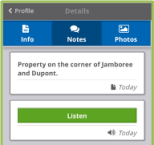
- To hear voice memos, view photos or read text notes related to a property, click on Details on the top-right of the Property Profile window.
|
|
- Select Photos or Notes to view or listen. A date stamp is provided for voice memos and notes for your reference.
- To listen to a voice memo, tap Listen. To read a text note, tap on the note for the text to display.
- To view a Photo, tap on the Photos button and a gallery of thumbnail images will appear.
Note: Once a note, voice memo or photo has been saved to a property, a green bookmark will appear on the property profile to indicate you have entered in custom information pertaining to that property.
|

|
Calling, Texting or Adding a Contact
- Locate your contact’s profile by typing in their name from the Locate Bar, or click on View Profile from the Property’s Profile in which they are linked to. The Contact’s profile will display.
|
|
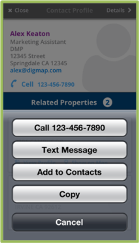
- Connect with your contact:
- To call a contact, click on the phone number in the Contact’s Profile. You’ll receive a prompt from your smartphone to initiate the call.
- To text a contact, hold down the phone number in the Contact’s Profile for 3 seconds. Your smartphone will provide multiple options to call, text, or add to your personal contacts on your smartphone.
|
|
|
Related Information
|