Getting to Know the Product Interface
|
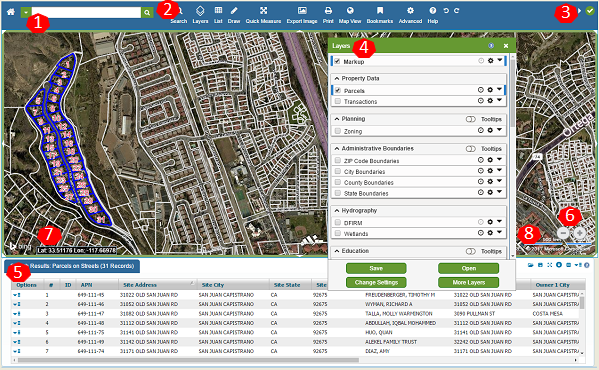
- Locate - Need to find a particular property, place, or thing? Search by address, owner, APN (Assessor's Parcel Number), street intersection, neighborhood, community, Points of Interest, and more.
- Main Toolbar - Access our essential search, data, presentation, and analysis tools, including a robust selection of Search Forms, Layers, the Search Results list, extensive drawing tools, and more.
- Notification Icons - Icons display here to confirm the success or completion of a task, such as your data load, or that a Map Report is ready to print. Click the notification icon to download reports, or find more information.
- Layers - This feature displays all layers available to you together with the ability to access the tools to load and reveal the important layer data attributes.
- Search Results List - From this tabular listing, view the attributes of the properties, or other layer features that match your search criteria, and export your Results List to a spreadsheet program, such as Microsoft Excel®.
- Zoom Icons - Zoom in or zoom out to change the map view.
- Latitude & Longitude - Displays your specific map screen location, which dynamically updates as you navigate and move your cursor.
- Scale Bar - Provides a map scale, that updates as you zoom in or out.
|
Navigating the Map Screen
Zooming, Panning, Identifying and Nudging
- Zoom Buttons:
- To zoom in, click on the plus.
- To zoom out, click on the minus.
- Mouse Wheel:
- Move your cursor over a location.
- To zoom in, roll the mouse wheel forward.
- To zoom out, roll the mouse wheel backward.
- Mouse Double-Click:
- Double-click the map to zoom in and center the map at the location of your double-click.
- Each double-click zooms in one zoom level.
Zoom to a Rectangle:
- While holding down the SHIFT key on your keyboard, click the map screen and drag your mouse to draw a rectangle (visible onscreen).
- Release the mouse button. The map screen zooms to the rectangle.
Panning:
- Click the map screen and drag your mouse to your desired location.
Identifying Map Information:
- The Map in GovClarity has a wealth of information available for you to explore. To identify shapes and markers on the map, simply click on them with your mouse. You can also select them from the tooltip that displays when you hover over a feature.
Note: For a feature to show up in the tooltip, the tooltip toggle must be activated in the Layers Panel. Alternatively, you can select more results from the tooltip, to see all available features where you click.
Nudging:
- Click the nudge bars on the perimeter of the map screen to incrementally move the map left, right, up, or down.
- When you hover your cursor over a nudge bar, it becomes yellow.
Undo/Redo:
- To undo your last zoom, pan, or nudge, click the Undo icon
 on the Main toolbar. on the Main toolbar.
- To redo your last zoom, pan, or nudge, click the Redo icon
 on the Main toolbar. on the Main toolbar.
Note: See the section above, Getting to Know the Product Interface, for the location of the Main toolbar.
|

|
Related Information
|