|
GovClarity® Help > Documentation > Publish to CommunityView™
|
|
This documentation outlines the workflow associated with sharing (publishing) data from GovClarity® to CommunityView™. The ability to easily share agency data with the public, via an easy to use web-based map, is an important constituent engagement tool. Sharing data with the public requires careful thought and attention to ensure that information is easy to understand and logical.
Before sharing data with the public, think about
- Is this information relevant?
- Is this information current?
- Is the layer style (color/labels/symbols) logical?
- Should the public be able to click on (identify) the layer in CommunityView™?
- If so, which layer attributes (fields) should be viewable in the information balloon?
- Can and should this information be linked to Parcels? (ie. linking neighborhood boundaries to parcels provides neighborhood information when the public searches or identifies a property)
- Can the layer be enhanced by linking photos, documents, pdfs, or a website?
- What is a logical way to organize the data into Map Themes? (which layers should be logically grouped together).
You can find best practices associated with CommunityView™ and sharing data with the public in the Best Practices section of our Local Government Help Center: Best Practices
|
Requirements
|
- Layer must be loaded to the USER folder. Refer to the Data Loader documentation for more information.
- User must have ADMIN access to the Account
- Account must have CommunityView™ Module
|
Prepare the Layers
Modifying the Information Balloon
- Click the Identify button next to the layer name (ensure the "i" is red). Now when you click on the layer in the map window, an information balloon opens
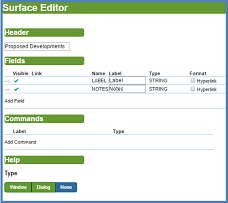
- From the information balloon, click commands. From the commands menu, select Edit This Surface option which opens the Surface Editor, from here you can edit the fields that display in the information balloon.
- Within the Surface Editor window you have the ability to drag and move attributes up and down in the list, change the visibility or remove an attribute from the list (which removes it from the information balloon). These tools can be accessed by clicking the Options icon.
- Additionally, you can add attributes to the list by clicking on the Add Field button at the bottom of the list. A new window opens with a complete list of all the attributes associated with the layer. Simply click on any attribute to
add it to the list in the previous window.
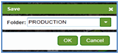
- When you are satisfied with your list of attributes for the information balloon, click the Save button which opens a save dialog box.
- Save your changes to the USER folder and click OK.
- The Parks layer is now styled and the information balloon displays the correct information. Next let's Publish the Layer to the CommunityView™ Folder.
|
|
Publish the Layer to CommunityView™
We have been working with our Parks layers in the USER folder of GovClarity®, now we are ready to move this information to the COMMUNITYVIEW™ Folder.
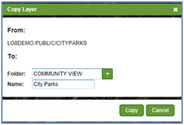
- Click on the Options icon
 to the right of the Parks layer in the Legend and choose Save A Copy As... to the right of the Parks layer in the Legend and choose Save A Copy As...
- From this window choose the COMMUNITYVIEW™ folder, name the Layer and click Save.
You should repeat this process for any additional layer you are interested in publishing to CommunityView™.
Tip: If you want to share this layer with your entire account, you will need to Save a Copy As... to the Production Folder and configure the layers in the Legend.
|
|
Setting Up the CommunityView™ "Home" Map Theme
There are many options for editing the look and feel of the data displayed in each CommunityView™ Map Theme. Each individual Map Theme can have its own unique set of layers, styles, order, controls, and features. Map Themes provide the ability to guide the public to specific information as well as ensure quick access to the data (eg. Zoning Map Theme or Parks Map Theme). In another section, we will discuss how to create "Single Topic Map Themes" and unique URLs associated with each map that can be leveraged across the agency website or through social media.
|
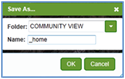
- Click on the Open button and from the drop down list, choose the COMMUNITYVIEW™ folder, and then select the "Home" Map Theme.
- This displays the list of layers that are currently in the "Home" Map Theme in CommunityView™.
- Next, click the Save button in the legend and save this Map Theme as "_home."**
Tip: Saving a CommunityView™ Map Theme with a preceding "_" hides the Map Theme from the public view allowing the agency the ability to make changes and edits without any impact to the public-facing maps. When you are satisfied with your Map Theme, save the Map without the "_" and your Map Theme will display in CommunityView™.
**This step is optional, but a best practice to control all changes before making them live on CommunityView.
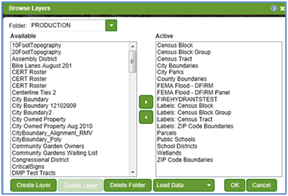
- To add any of the layers that were previously saved to the COMMUNITYVIEW™ folder, click the More Layers button, navigate to the COMMUNITYVIEW™ folder and move the layers from the Available folder to the Active folder. (See Steps 1 and 2 under "Prepare Layers" above for more details).
The layers are now added to the temporary "_home" Map Theme, and we can add labels, group the layers and define layer view status.
|
|
|
|
Adding Labels
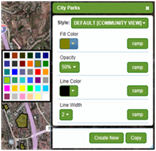
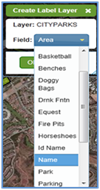
- Click the Options icon to the right of the Parks layer in the Layers Panel.
- Click Create Label in the menu.
- Select a Field from the drop-down menu that contains the values you want to display on the label(s). We want to display the Park Name - so we choose the Name field.
- Click the OK button. The map displays the label(s) and the Legend displays the label layer. Don't close the Create Label Layer balloon.
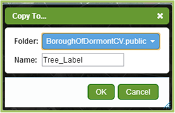
- Next, the Label needs to be copied to the CommunityView™ Folder. To do this, click Copy and save to the {accountname} CV.PublicFolder with the name of layername_label.
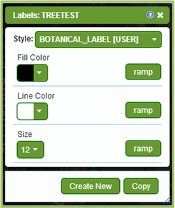
- Close the Create Label Layer balloon and reopen by clicking on the Options button and then Edit Style. Click on the Style dropdown and select the Style with the name LAYERNAME_LABEL [COMMUNITYVIEW] and then close the window.
Tip: For more information on how to group, moodify the style (font/color) of the label and other features, refer to the Thematic Mapper documentation for more information.
|
| 
|
Controlling Layers: Grouping and View Status
- Click on the Options icon to the right of any layer in the Legend and choose Layer Properties.
- From the Layer Properties window you can modify numerous items:
- Change the name of the layer as it appears in CommunityView™
- "Group" Layers and create "New" Groups.
- Add notes or information about the currency of the data or who loaded the data.
- Define when the zoom layer, or the level when a layer is turned on or off.
- Make the appropiate adjustments to each layer.
Tip: CommunityView™ also allows you to define whether a layer is automatically "On" or "Off" when the map is loaded and whether you can "Identify" or click the layer to get additional information.
- Set the layer to be identifiable in CommunityView, by clicking the identify icon. If the 'i'
 icon is blue, than the layer will be identifiable in CommunityView. If the identify icon is greyed out, it will not be identifiable. icon is blue, than the layer will be identifiable in CommunityView. If the identify icon is greyed out, it will not be identifiable.
- Additionally, if the layer is checked "On" in the map, it will default to be 'On' in CommunityView™ as well.
|
Saving CommunityView™ "Home" Map Theme
- Click on the Home Icon to center and adjust the zoom of the map. Center the map and adjust the zoom level. What you see on your map in GovClarity®, will be what you see in CommunityView™.
Note: The following Steps only apply if you chose to setup a temporary Map View in the previous steps. If you did not create a temporary Map View - the changes will be live on CommunityView™.
- _home = name of the temporary Map Theme previously saved
- To view your temporary Map Theme in CommunityView™ you will need to utilize a custom URL. There are two areas that need edited to view the temporary Map Theme:
- accountname = the name of your account
- "Group" Layers and create "New" Groups.
http://maps.digitalmapcentral.com/production/vecommunityview/
cities/accountname/index.aspx?mapName=_home
- When you are ready to share this Map Theme with the Public, remove the "_" from the name and save the map.
With CommunityView™ you can create unlimited Map Themes to help guide your users to specific information. By choosing the Options button next to any layer, you can remove layers from your layer list or add additional layers through the More Layers button. Again, what you see in GovClarity® is what you will see in CommunityView™. You can Save the Map Theme under a different name and then you will have the ability to open up that new Map Theme in CommunityView™.
|
Creating Single Topic Map URLs in CommunityView™
A best practice in publishing data to constituents using online maps is to introduce constituents to your map portal, CommunityView™, with single topic maps. Single topic maps are simple for residents to understand and use and help them answer their questions quickly. They are comprised of one or a few related data sets, that are automatically displayed on your CommunityView™ map when a constituent clicks on map link from your site or outreach communications.
|
- Create a Map View (Map Composition) for your single topic map in GovClarity® and publish to CommunityView™ following the steps above
- Append the following to the end of your CommunityView™ URL
- ?mapname=Map Composition Name, e.g. ?mapname=streetsweeping
- If your Map Composition has spaces in between words, omit them in the mapname. For example, if your Map Composition is named Street Sweeping the mapname would be StreetSweeping
- Your CommunityView™ URL is: http://maps.digitalmapcentral.com/production/vecommunityview/cities/CityName/index.aspx.
- Example: If your city name is Any City, your CommunityView™ URL would be
- http://maps.digitalmapcentral.com/production/vecommunityview/cities/AnyCity/index.aspx
and your single topic map URL for your Street Sweeping data would be
- http://maps.digitalmapcentral.com/production/vecommunityview/cities/AnyCity/index.aspx?mapname=streetsweeping
|
Related Information
|