|
LandVision™ Help > Documentation > Data Loader
|
|
This document will show you the steps and requirements to load a spreadsheet of Addresses or Coordinates into LandVision™.
|
Preparing Address or Coordinate Data for Importing
|
It is important to correctly prepare your Address and Coordinate spreadsheets before loading them into LandVision™. The requirements in this section are for both Address and Coordinate data sets. Differences in requirements are noted.
Requirements:
- Required File Type: Address and Coordinate data can be stored in one of the following formats: .csv, .xls, .xlsx, .xlsm, .xlsb, .ods, .fods, .txt, .sylk, .html, .dif, .dbf, .rtf, .prn, .eth
- Upload File Size Limit: 30MB
- Required Fields: Your Address and Coordinate spreadsheet files must contain, at a minimum, the exact fields below:
- Required Address fields:
- source_address
- source_city
- source_state
- source_zipcode
- Required Coordinate fields
- Not Supported in Fields: Your spreadsheet file cannot include fields with these values:
- Field names: spaces, special characters, field names starting with numbers
- Currency (e.g., dollar signs)
- Commas
- Percent signs
Tip: Use underscores to replace the spaces in your field names.
- Character Limit in Fields: 100
- Another note, is you do not have to load all the fields in your spreadsheet. Only keep the fields you want loaded into LandVision in the spreadsheet.
- IMPORTANT!
Reserved Field Names: Your spreadsheet file cannot include the following field names:
- Key
- Geometry
- Sidx
- _Cftid
- _Geo_Type
- _Dmp_Id
- _Sessionid
- _Recseq
- _Createdby
- _Createddate
- _Retiredby
- _Retireddate
- _Status
- _X_Coord
- _Y_Coord
- _Xmin
- _Ymin
- _Xmax
- _Ymax, Unit
- Address_number
- Predirectional
- Prefix
- Street
- Suffix
|
- Postdirectional
- UnitDesignation
- City
- StreetAbbr
- Zipcode
- Countycode
- Geostatus
- MatchStatus
- State
- Score
- Parcel_id
- AddressID
|
- GEOMETRY_BIN
- Opacity
- Size
- Color
- Image
- _SEQ_ID
- _SYMBOLOGY
- DRAW_TYPE
- Location_ID
| |
- The full reserved keyword list can be found, here
|
Creating an Address or Coordinate Layer
|
Steps to create an Address or Coordinate Layer, and load your spreadsheet:
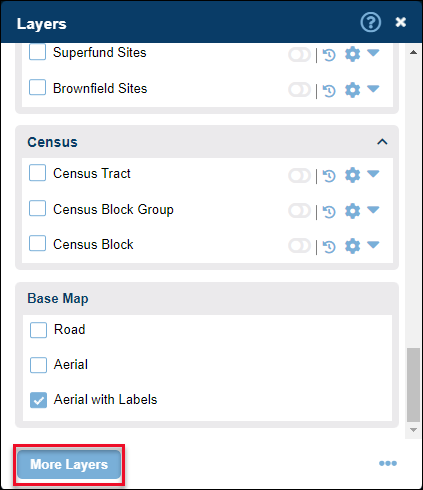
- Click the Layers icon
 on the Tool Bar. on the Tool Bar.
- Click the More Layers button at the bottom of the Layers panel.
- Select a folder from the Folder drop-down list in which to save your data set.
Note: Most commonly used folders:
- USER - Only you can view layer.
- SHARE - Allow others on your LandVision account to access this layer
Note: To create a new folder for your data set, select New. The Create Folder window appears. Enter the name of your new folder and click OK. Your new folder appears in the Folder drop-down list.
- Click the Load Data, then select Spreadsheet from the dropdown menu.
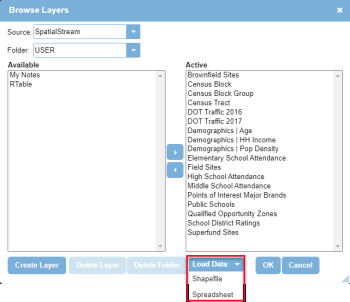
Note: If you don't have permission to use your selected folder, the Create Layer button is grayed out. Select another folder to save your data set.
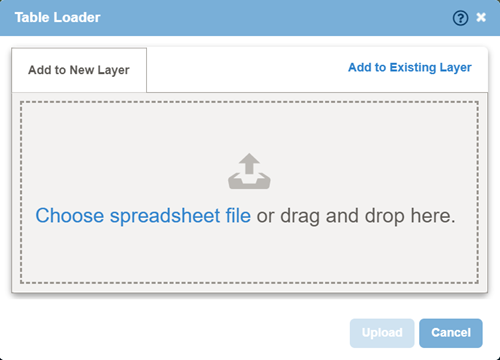
- In the Table Loader window there are the following options:
- Add to New Layer:
- Drag & Drop file: Click and drag your spreadsheet to this location from the folder it's contained in to automatically load it into LandVision.
- Choose a spreadsheet file: Click this to open a file explorer window to navigate to the spreadsheet file you wish to use.
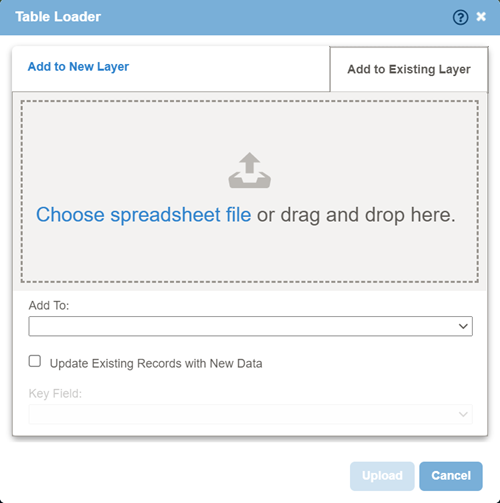
- Add to Existing Layer
- Drag & Drop file | Choose a spreadsheet file:
Function the same as above for Add to New Layer.
- Add To: Select the Existing Layer you want to add the new data to.
- Update Existing Records with New Data checkbox: Select to have LandVision update any duplicate records with the new data from your spreadsheet.
- When the spreadsheet has been uploaded, the Create Layer window will appear. This window allows for an of the field values to be modified.
- Folder Name: This is automatically created by LandVision
- Layer Name: If you are creating a new layer, name it. This will be the name that will appear for this data in the Layers Panel.
- Geometry Type: For Address and Coordinate data, you must choose
Point .
(None is only used for non spatial tables. This is uncommon for most users.)
- Fields: These are the various data fields to be imported from the spreadsheet. If you need to add a field that isn't present in your spreadsheet you can click the "Add field". If there is a field in your spreadsheet that you don't want to import into LandVision, you will need to delete it.
- Name: These are the field names sourced directly from the spreadsheet. The system will remove any special characters, or spaces that are incompatible.
Note: If you are using Internet Explorer 11 the fields will not be added automatically. You will need to type them out one at a time exactly as they appear in your spreadsheet.
- Displayed Name (Optional): These names are how LandVision will label the spreadsheet fields within LandVision.
Note: If no Display Name is given, the default label in the "Name" field will be used.
- Type: This can be used to assign what type of data contained in the field represents. LandVision will set a default based on the type of data it detects in the spreadsheet.
Note: If you are using Internet Explorer 11 the data type will not be selected automatically. Please manually select the type of data that is recorded in the fields.
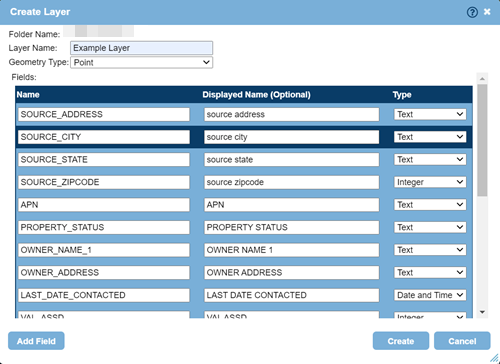
- Once you have completed all of the setup steps, click the Create Button.
After some brief processing, your layer will finish uploading. Switch to a different folder, and then switch back to the folder you loaded it to and the Layer name will appear in the Available list of the Browse Layers window . Highlight it and move it to the Active list to view it on the map.
|
Related Information
|