|
LandVision™ Help > Documentation > Map Views
|
LandVision™ enables you to conveniently save multiple custom map views that you can return to at any time. Any attribute displayed in your map view, such as a filter, search results, styling and/or layer can be saved within your view. Save time by quickly accessing a saved map view for presentation purposes, or, share them with your team members to collaborate on project information.
Tip: You can create a different Map View for each of your clients and/or territories.
Note: Map Views operate differently in LandVision™ Commercial and Builder editions. This documentation addresses Map Views in Commercial and Builder editions only.
|
Saving a Map View
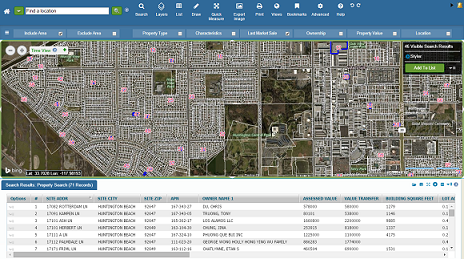
- Create your desired view by applying any search criteria, filters and/or search results.
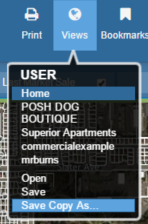
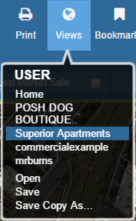
- Once you have finalized your map display, select the Views icon from the toolbar.
|
|
- Click Save Copy As from the drop down list.
Note: Clicking on Save is a quick way to save your view and will update your current active view from the drop-down menu.
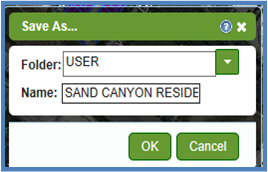
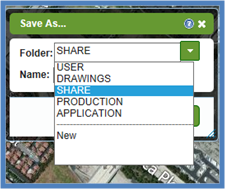
- Choose the folder in which you would like to save your map view. Then, Name your map view.
Note: When naming a map view, the use of special characters is not permitted. Only upper and lower case letters and spaces are permitted.
- Click OK to save your map view.
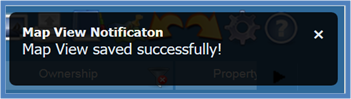
- A notification will appear in the right-hand top corner to confirm that your map view has been saved successfully.
|
|
|
|
|
Opening a Map View
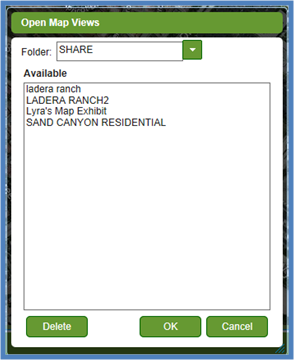
- Click the Views icon in the toolbar.
- In the drop down menu, you will see your saved map views.
- Click on the name of your map view and it will appear.
Note: To delete a map view, click Open from the drop down menu and select the map view you wish to delete. You cannot delete the view that you are currently viewing.
|
|
Sharing a Map View
- Create your desired map view.
- Click the Views icon and select Share from the Folder options.
- Name your map view and click OK. Your map view is now saved in the Share folder.
Note: All map views in the Share folder are available to view by all other account users in your organization. To share a folder with specific account users, refer to the Content Sharing section or view Related Information.
|
|
Related Information
|
